


Live Loops Resources
The Apple support section is a good place to start for additional resources and a Live Loops overview. We're also big fans of the "Everyone Can Create: Music" iBook from Apple Education. Everyone Can Create includes interactive activities, such as "Triggering Loops" and "Customizing with Loops" in the form of fun projects that help you acquire key skills you need to build a final project.
If you're brand new to making music, this would be a great place to get comfortable with the Live Loops interface before you start incorporating the Jamstik into your workflow. The book also includes sections on analyzing and deconstructing songs, remixing tracks, creating your own tracks. You can download the iBook for free here on iTunes.
Live Loops Tutorial
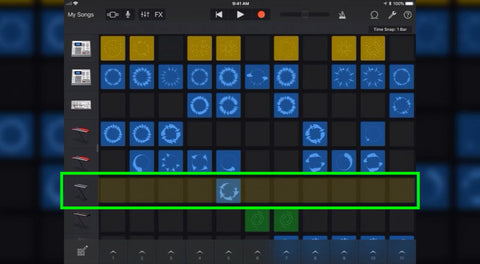
Across the bottom of the screen, you’ll see a different set of icons, called Triggers.
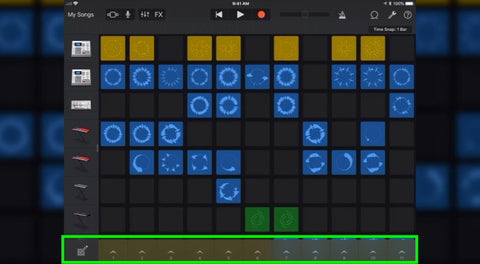
Tapping a trigger launches all of the clips in the vertical column above the trigger.

Cells can record MIDI from a Jamstik playing an instrument track, or it can contain an audio loop. One quick way to know whether a cell is MIDI or audio is to look at the cell color. MIDI is green, audio is blue.

We’re going to explore recording MIDI into various cells. If your Jamstik isn’t already connected, power it up and make sure Bluetooth is enabled on your iOS device.
Now, in GarageBand, we can go to Settings (aka the wrench icon) and select Advanced, then Bluetooth MIDI Devices and click your Jamstik ID in the Bluetooth MIDI Devices chooser.


We’re going to start by selecting “New.”


This is editable by clicking the bar length indicator on the right in the timeline, but we’ll leave it at 4 bars.

If we select Record in the transport bar, we can begin to record our performance into the cell.
Once we’re happy with a take we can open the Track Controls to help shape what we’ve just recorded; Volume, Panning, Compression, EQ, and FX in the Output settings, or modify the part by quantizing, transposing, or allowing Merge Recordings for future takes.

Now, unlike the Tracks interface for GarageBand, the cells in Live Loops are set to repeat at their designated bar length, and it’s possible to have multiple cells repeating at different bar length intervals. So, for our first cell, we recorded 4 bars, but our next cell we’re going to record and edit it down to 1 bar, and then we’ll record a couple of 2 bar cells.

We’re going to Copy, then select an empty cell in the same row and paste it there.

Launching a new trigger while an existing set of cells are actively playing will launch your new cued cells at the next Snap Value for the grid, as displayed to the right in the timeline.

The snap value defaults to 1 bar. For example, launching a new set of cells on beat 3 of the current bar won’t take effect until the current bar is finished. You’re not limited to using Triggers to launch cells. You can launch cells individually just by selecting them.

To fill a cell with an audio loop, you’ll need to find and audition the audio you’d like to use. Tapping the loops icon in the upper right corner will drop down a chooser that includes search functionality.

You can search or scroll through the loops library and listen to the loop you’re interested in just by tapping the loop name. Once you find something you like, you can drag it to a new or existing audio track. (If you try to drag audio into a MIDI track you’ll see this error message).

Pressing 'Record' will launch Live Loops into a mode where everything played from a cell is recorded into traditional GarageBand Instrument and Audio tracks in the background.

Working with Live Loops is a different approach to working within GarageBand, and the workflow change might inspire you differently than the traditional linear approach. Hopefully, this tutorial has helped answer some questions about Live Loops and gives you some tools for working in the interface.
1 Response
Leave a comment
Comments will be approved before showing up.
Also in Jamstik Blog


Using a Jamstik MIDI Guitar with Analog Hardware


Using Logic Pro to Create Guitar Tabs with a Jamstik MIDI Guitar


Bill Furner
September 25, 2019
Gosh I wish there was more information on youtube regarding Jamstik 12 and it being a tool to play-compose fingerstyle arrangements through the use of tab editors like Guitar Pro 7.5.
Sounds like finally there is a midi guitar that can make tabs way up the fretboard without missing too many notes? Or is there a reason this information is not out because Jamstik 12 can’t accurately do what I am so much hoping it can?