
BeatHawk is a music creation app created by UVI, a France-based development team that makes software for professional audio production. I’ve had some time to spend with Beathawk, and I must say, it’s a VERY polished and independent app for music creation. From the quality sound-packs, clean interface, and usability, it’s a homerun for any mobile musician. Paired with the jamstik+ as my guitar controller, I was extremely impressed with how easy it was to compose and bounce down this track!
If you don't already have BeatHawk, you can download it from the App Store for $9.99.
Check out the video example below to hear the final track, then scroll down for a full walkthrough!
Now Onto The Walk-Through!
Follow along with these video tutorials to get you started with Beathawk
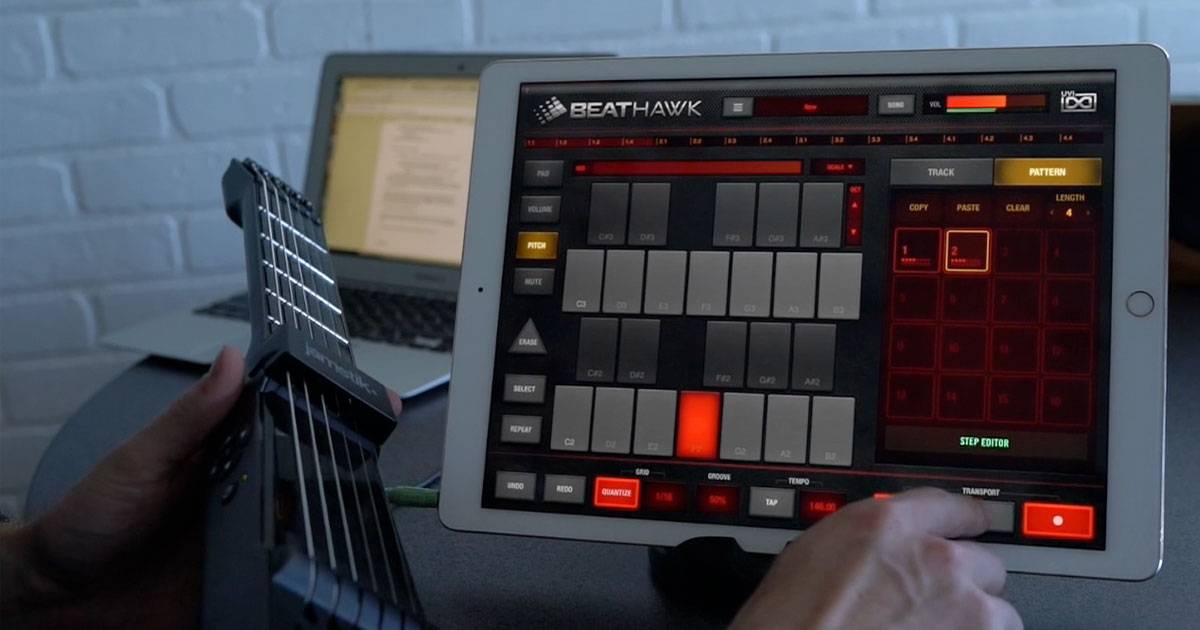
Connection (make sure Bluetooth is enabled on your device)
- Power on the jamstik+
- Open Beathawk
- Go to Menu > Audio/MIDI Preferences
- Tap Bluetooth Devices and connect the jamstik+
- Ensure that your jamstik+ is enabled (tap your JS serial #).
- You’re now connected! Exit this screen and enter the main view.
Setting Up The Session
- Go to Menu > Load Kit / Project > Factory Songs > HipHop Demo Song > Load Kit Only
- In this example, I used the ‘Electro Kit’ from the included ‘EDM Factory Pack’.
- In the Pad View, select the bottom left pad called “088-Old But Big”.
- We are going to replace this with a new drum-kit. To your right, tap “Browser”.
- In the soundpack list, select EDM Factory > Drum Elements > Drum Kits > Electro House.
- Tap the Load button to select Electro House. Once it says Loaded, exit this screen.
- In the Main View change your Tempo to 146
- Last thing. We are going change the length of our patterns to be 4 bars.
- Tap “Pattern”
- Change the Length to 4 (swipe up and down near the number)
- Alright, we are set to start recording our track!
Making your first loops in BeatHawk
For this example, I’m going to recreate the 3 basic loops similar to my demo video.
- In Pad View, tap on “PNO Epic House”. This is the piano patch.
- Tap “Pitch” on the left side of the screen to enable it.
- Now if you strum the jamstik+, you will notice that the piano patch is enabled.
- Now it's time to record the first loop in Pattern 1.
- Tap the record button, and after 4 clicks you will start tracking.
- After you have successfully recorded the piano, listen back to see if you like the take.
- If you notice mistakes or want to edit, enter the Step Editor.
- Also, take advantage of the Quantitize Feature. (I recommend leaving the default).
- Next, let's copy Pattern 1 and paste it onto the blank Pattern 2. Then we will record bass guitar over Pattern 2.
- Go to the Pad View and select "BAS-Golden Way". Switch back to Pitch View and repeat the process. Remember you are tracking on top of your original piano on Pattern 2.
- Next, copy Pattern 2 and paste it onto Pattern 3. Now we will add drums.
- Record beat with Electro House Kit. Once this is done we are ready to arrange our mini-song!
Arrangement
- Okay! So we have 3 patterns and we want to start a small arrangement. This will get you acclimated to the Song Interface section of BeatHawk. Tap “Song” on the top of the screen.
- Simply drag Pattern 1 onto the timeline, along with Pattern 2 and 3. Put them in any order you would like and then press Play.
- Go back and make more patterns, and then put them in order on the timeline.
Exporting
Beathawk has a unique and cool way of exporting tunes. My favorite is using iCloud to download all of the tracks. When you're done, simply tap Export (the first selection).
- Go into Menu > Load Project > User Library > Find your song under Projects
- Tap with TWO FINGERS on your project folder name and select iCloud Export File.
- It will prompt you to do iCloud information, pick the location and add it to your iCloud Drive.
- Go to iCloud’s website to download it on your laptop to do any video editing or syncing.
- Remember to tag and share!! #jamstik #BeatHawk #zivix #uvi #mobilemusic
Conclusion on Sounds & Interface Usability
The starter sound packs work amazingly with just about anything! Whether your preferred music style is electronic or more traditional, I’m positive you’ll be pleased with the selection of different sounds available.
As far as usability, the only hurdle I had to jump through was adjusting to working with the touch screen on the iPad as opposed to using a keyboard with hotkeys and a mouse in my computer-based DAWs. This is mainly the limitations of the iPad touch screen, but after about an hour of working on the interface, my workflow got much faster. With the vast availability of music production apps on iOS the past few years, I have been getting caught up with the functionality and convenience of iPad/iPhone DAWs like Garageband. In short, if you have experience using music apps on mobile devices, you should be able to navigate this with a few tries.
Note: I did NOT have to use any tutorials or set-up guides to get me started! Within an hour of messing around with the app, I was able to stumble upon all of the functionality I needed to create quick song ideas.
Overall, BeatHawk is an excellent app paired with the jamstik+. It includes all of the main features you could want in a music creation app, and with the large variety of sound packs available, it’s a wonderful alternative to GarageBand. I highly recommend everyone give this app a try!
Share:
Was the jamstik+ on Shark Tank?
Start Making Music On Your PC with Cakewalk's SONAR Artist