
In case you haven't seen it, Apple dropped a serious 2.1 update to their GarageBand app for iOS at the end of January. If you prefer to read the recap, it continues below the video. Otherwise, we cover it in a video here:
There’s a whole new interface called Live Loops, the addition of the Drummer tracks feature from Logic Pro X, more drum kits, Audio Unit extensions, EQ and Compression, and the reduced audio buffer size are all welcome additions to the staple of iPad music making apps. Let’s find out how to navigate through the new screens and find where some of the necessary Settings menu items got relocated to, and get you on your way to using these new features.
Getting Connected

For jamstik+ and puc+ users (and Bluetooth MIDI users in general) you’ll find out quickly that our trusty Bluetooth MIDI Devices selection has been moved to Settings > Advanced, and is only available if you also select Run In Background. Once Run In Background is activated, the Bluetooth MIDI Devices becomes visible at the bottom of the Advanced settings pane.
Use With Music Apps // don’t for now

You’ll notice just above the Bluetooth MIDI Devices selection is an option for you to Use with Music Apps. If you’re going to only be using GarageBand to generate sound or record, I suggest you don’t activate Use with Music Apps because it changes the new lower audio buffer size to the old higher audio buffer size. Your buffer size has an impact on your latency of the audio, so keep that in mind if you do intend to Use with Music Apps.
EQ and Compression

If you open the Mixer (or Custom) pane you’ll see three new parameters you can adjust; Treble, Bass, and Compression. These are fairly straightforward, the Treble and Bass sliders are null in the center and boost by sliding to the right or cut by sliding to the left. These will help if you need to pull some bass off of a boomy part, or add treble to brighten up a dull track.
The Compressor slider works like an old school dbx 163 single slider compressor. If you’re unfamiliar with what audio compression does, a simple explanation is that compression manages the loud peaks in your signal. This can create the impression that a track is louder, because you’ve taken something that used to require 24 decibels of dynamic range (loud peaks to softer levels) and now you may only need 16 or 12. Gain makeup is applied behind the scenes to restore what level was lost by the compressor, so your track is a little more leveled and pumped up. Compression is pretty popular in just about every genre of popular music, so experiment to find something here that works for your taste. GarageBand’s compressor is pretty simple; the more you slide to the right, the more compression is applied to the signal.
Live Loops

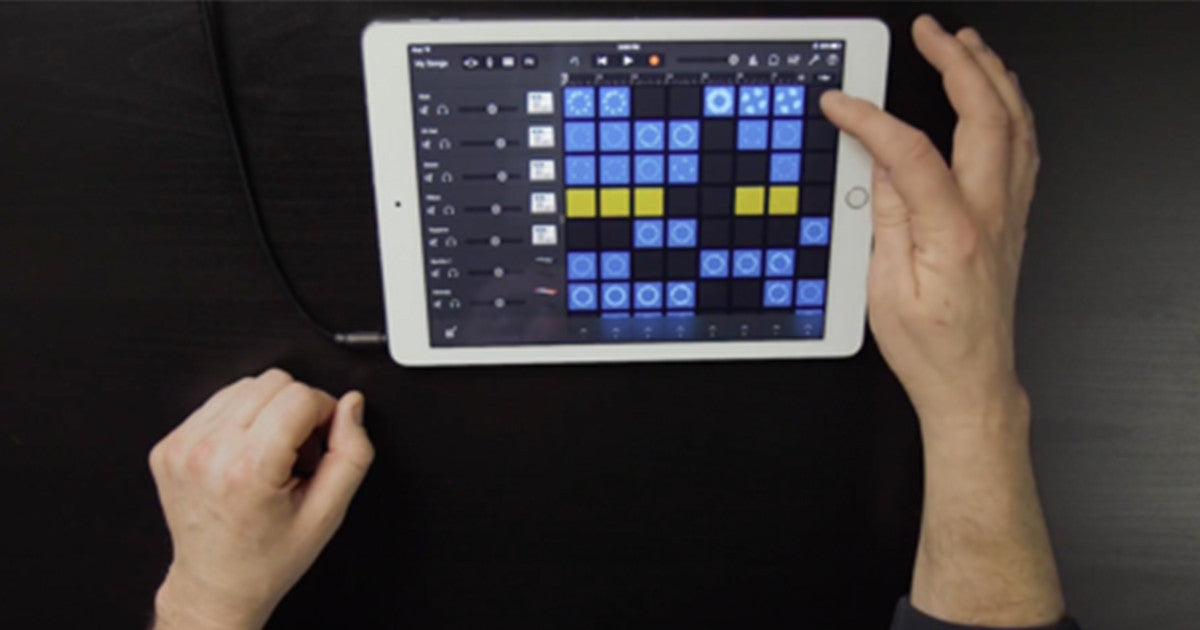
One of the first things you may notice in this update is the new Live Loops interface. There are 9 preset palettes of Live Loops in different genres. If you’ve used Ableton Live on the Mac, Novation’s LaunchPad app, or even the Loopy app made famous by Jimmy Fallon on the Tonight Show, you might recognize the interface concept. In a nutshell, Live Loops is a clip based interface (GarageBand calls them “cells”) or a non-linear method of launching audio, drummer, or midi “cells" from a grid of triggers.
If you select the EDM preset, you’ll see a bunch of audio cells in blue, and a Drummer cells in gold. The cells are organized by instrument tracks horizontally. Touching any cell launches it’s content on the next Time Snap value step. The Time Snap Value works like a quantize gate to launch selected cells at a specific musical timing interval.
GarageBand defaults the Time Snap Value to 1 Bar, so anything we select won’t launch until the next bar comes around. To change the Time Snap Value you can click it in the upper right hand corner. It defaults to 1 bar but can be set as low as a sixteenth note or even turned off for instant cell launch. This gives you the opportunity to select one or any number of cells to all launch at the top of the next bar. The bottom of the Live Loop grid interface has cells that trigger everything in the vertical column together.
To use Live Loops in a GarageBand Song, you’ll need to record them into Tracks. It’s easy, just hit record and start triggering cells. GarageBand will record audio into tracks the entire time you’re recording. Once you’ve got the Live Loops recording you want to use, you can switch back to the Tracks interface to record or play just like GarageBand used to do.
Creating Live Loop Cells
Let’s go back to Live Loops and add some new cells. If we scroll to the bottom of the screen we’ll see the familiar “add tracks” + symbol. When clicked we get the option to add an instrument track, or add audio loops. Select an Instrument here to use the jamstik+ and puc+ to control one of Garageband’s instruments via MIDI, just like we used to do in the traditional Tracks screen.
A cell in Live Loops can be any length of bars or beats, and you can edit the length in the upper right hand corner of the time ruler. It defaults to 4 bars, so we’ll do one cell in 4 bars and one in 2. The first cell you make after you first select the instrument will work similar to the process of recording a Track in previous versions of GarageBand, but you depending on whether or not you had other cells playing you might not hear any other activity.
Once you have an Instrument track already set up, you can play cells while recording a new cell by tapping an empty cell twice, the option to Record Into Cell or Edit the cell appears.
Editing Live Loop Cells
In the bottom left corner of the Live Loops interface is the Cell Editor. Selecting it gives you the ability to perform some simple edits on cells; Cut, Copy, Delete, Record Into Cell, Edit, or change the Settings.
In the cell Settings you have ability to adjust the Velocity, independently change the Time Snap value for the cell, change the Play Mode (from Play or Stop when tapped, Play while pressed, or Retrigger,) turn the cell Looping off or on, change the length, change the quantize value, transpose the pitch (if a MIDI cell,) change the speed, and switch between forward or reverse playback.
Using the Drummer

Let’s add a Drummer into the Tracks interface. If you want to use Drummer in Live Loops it works in a similar fashion.
Add a track and select Drummer. Drummer will default to generating 8-bar phrases. You’ll see the trash can delete symbols indicating that you don’t have to keep these. Also they’re not fixed - you can edit them in real time if you want. Before we edit them, let’s select a Drummer profile and a preset.
Tap the Drummer to scroll through the available Drummer profiles. You’ll see a brief description of each profile that gives some indication of what you should expect. You’ll also see an icon of a drum kit or a drum machine that should let you know if the profile you’re selecting is more of a DJ or a drummer. Pick Mason, and GarageBand will return back to the Drummer edit screen.
Next to Mason’s avatar we’ll see a number beat presets that you can audition and select. These form the basic groove your drummer track will have, but you have options to customize them below.
Working from left to right, there’s a simple X-Y interface for the Drummer’s performance. The drummer’s dynamics are controlled vertically, and the complexity of the performance is controlled horizontally. Beneath the X-Y is the selection for the drummer’s swing value. Click it and you’ll see five options that cover a range of styles.
In the center is the drum kit indicator which displays what pieces are selected, in gold. You can switch them to audition what’s available. Below the kit is the Fills slider. When you need captain showboat with lots of fills, feel free to slide it to the right. If you need a more simple groove, move it to the left. It’s a “season to taste” thing.
All the way to the right you’ll see the variation sliders for the percussion, cymbals, and kick and snare. These give you the ability to tailor the performance in a more nuanced fashion than the X-Y interface. These work from a range of low values being more simple and increasingly complex as you slide to the right. Also, the Follow selection allows you to use one of your instrument tracks as the guide for the kick and snare. Overall the addition of Drummer to GarageBand is a great value for musicians of all calibers.
Other additions

Aside from these new features and interface screens, Apple added over 1,200 new Apple Loops and sounds, the easiest sounds to identify are the new kits in the drum instruments. Also, if you’re using an iPhone 6S or 6s+ you can take advantage of the 3D touch features as well.
So - GarageBand for iOS is a major advancement for the app, and it has some features that begin to rival Apple’s flagship DAW Logic Pro X. I encourage you to update to GarageBand 2.1 if you haven’t already, connect your jamstik or puc+, and start making music.
Share:
Utilizing the Jamstik in Music Therapy Sessions
How to use the Jamstik+ in Ableton Live - Free Ableton Patch Download